设计模式解密:原型模式的终极指南(PHP/Go双实现)
一、什么是原型模式?
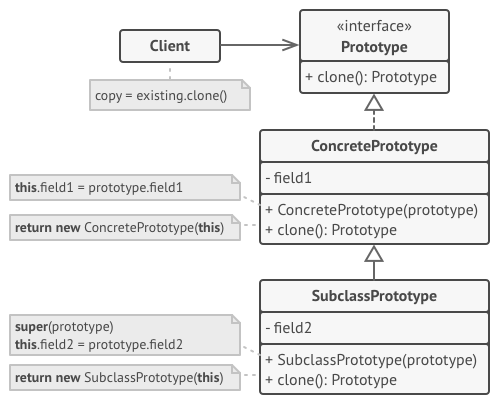
原型模式(Prototype Pattern) 是一种创建型设计模式,它通过复制现有对象来创建新对象,而不是通过构造函数。原型模式的核心思想是通过克隆(Clone)来避免重复初始化对象的开销,特别适用于创建成本较高的对象。
核心角色:
原型接口(Prototype):定义克隆方法
具体原型(Concrete Prototype):实现克隆逻辑
客户端(Client):通过克隆创建新对象
二、适用场景
✅ 需要创建的对象成本较高(如数据库连接、复杂配置)
✅ 需要动态创建对象,且对象类型在运行时确定
✅ 需要避免构造函数的重复调用
✅ 需要创建对象的深拷贝或浅拷贝
三、PHP实现方案
1. 基础实现(浅拷贝)
interface Prototype {
    public function clone(): Prototype;
}

class UserProfile implements Prototype {
    private $name;
    private $email;
    private $preferences;

    public function __construct(string $name, string $email, array $preferences) {
        $this->name = $name;
        $this->email = $email;
        $this->preferences = $preferences;
    }

    public function clone(): Prototype {
        return clone $this; // 使用PHP的clone关键字
    }

    public function setEmail(string $email): void {
        $this->email = $email;
    }

    public function getProfile(): string {
        return "Name: {$this->name}, Email: {$this->email}, Preferences: " . implode(", ", $this->preferences);
    }
}

// 使用示例
$original = new UserProfile("John Doe", "john@example.com", ["Dark Mode", "Notifications"]);
$clone = $original->clone();
$clone->setEmail("john.doe@example.com");

echo $original->getProfile(); // 输出:Name: John Doe, Email: john@example.com, Preferences: Dark Mode, Notifications
echo $clone->getProfile();    // 输出:Name: John Doe, Email: john.doe@example.com, Preferences: Dark Mode, Notifications
2. 进阶实现(深拷贝)
class UserProfile implements Prototype {
    private $name;
    private $email;
    private $preferences;

    public function __construct(string $name, string $email, array $preferences) {
        $this->name = $name;
        $this->email = $email;
        $this->preferences = $preferences;
    }

    public function clone(): Prototype {
        $clone = clone $this;
        $clone->preferences = array_map(function ($item) {
            return is_object($item) ? clone $item : $item;
        }, $this->preferences);
        return $clone;
    }

    public function setEmail(string $email): void {
        $this->email = $email;
    }

    public function getProfile(): string {
        return "Name: {$this->name}, Email: {$this->email}, Preferences: " . implode(", ", $this->preferences);
    }
}

// 使用示例
$original = new UserProfile("John Doe", "john@example.com", ["Dark Mode", "Notifications"]);
$clone = $original->clone();
$clone->setEmail("john.doe@example.com");

echo $original->getProfile(); // 输出:Name: John Doe, Email: john@example.com, Preferences: Dark Mode, Notifications
echo $clone->getProfile();    // 输出:Name: John Doe, Email: john.doe@example.com, Preferences: Dark Mode, Notifications
四、Go实现方案
1. 基础实现(浅拷贝)
package main

import (
    "fmt"
)

type Prototype interface {
    Clone() Prototype
}

type UserProfile struct {
    Name        string
    Email       string
    Preferences []string
}

func (u *UserProfile) Clone() Prototype {
    return &UserProfile{
        Name:        u.Name,
        Email:       u.Email,
        Preferences: u.Preferences, // 浅拷贝
    }
}

func (u *UserProfile) SetEmail(email string) {
    u.Email = email
}

func (u *UserProfile) GetProfile() string {
    return fmt.Sprintf("Name: %s, Email: %s, Preferences: %v", u.Name, u.Email, u.Preferences)
}

// 使用示例
func main() {
    original := &UserProfile{
        Name:        "John Doe",
        Email:       "john@example.com",
        Preferences: []string{"Dark Mode", "Notifications"},
    }
    clone := original.Clone().(*UserProfile)
    clone.SetEmail("john.doe@example.com")

    fmt.Println(original.GetProfile()) // 输出:Name: John Doe, Email: john@example.com, Preferences: [Dark Mode Notifications]
    fmt.Println(clone.GetProfile())    // 输出:Name: John Doe, Email: john.doe@example.com, Preferences: [Dark Mode Notifications]
}
2. 进阶实现(深拷贝)
go
复制
package main

import (
    "fmt"
)

type Prototype interface {
    Clone() Prototype
}

type UserProfile struct {
    Name        string
    Email       string
    Preferences []string
}

func (u *UserProfile) Clone() Prototype {
    preferences := make([]string, len(u.Preferences))
    copy(preferences, u.Preferences) // 深拷贝
    return &UserProfile{
        Name:        u.Name,
        Email:       u.Email,
        Preferences: preferences,
    }
}

func (u *UserProfile) SetEmail(email string) {
    u.Email = email
}

func (u *UserProfile) GetProfile() string {
    return fmt.Sprintf("Name: %s, Email: %s, Preferences: %v", u.Name, u.Email, u.Preferences)
}

// 使用示例
func main() {
    original := &UserProfile{
        Name:        "John Doe",
        Email:       "john@example.com",
        Preferences: []string{"Dark Mode", "Notifications"},
    }
    clone := original.Clone().(*UserProfile)
    clone.SetEmail("john.doe@example.com")

    fmt.Println(original.GetProfile()) // 输出:Name: John Doe, Email: john@example.com, Preferences: [Dark Mode Notifications]
    fmt.Println(clone.GetProfile())    // 输出:Name: John Doe, Email: john.doe@example.com, Preferences: [Dark Mode Notifications]
}
五、关键实现差异对比
六、模式优缺点分析
👍 优点:
减少初始化开销:通过克隆避免重复初始化
动态创建对象:运行时确定对象类型
简化对象创建:隐藏复杂对象的创建细节
👎 缺点:
深拷贝复杂性:需显式处理引用类型
违反封装性:可能暴露对象内部结构
性能问题:深拷贝可能带来额外开销
七、实际应用案例
1. 游戏角色复制
// PHP示例
$originalCharacter = new Character("Warrior", ["Sword", "Shield"]);
$cloneCharacter = $originalCharacter->clone();
$cloneCharacter->setWeapon("Axe");
2. 配置对象复制
// Go示例
originalConfig := &Config{Theme: "Dark", FontSize: 14}
cloneConfig := originalConfig.Clone().(*Config)
cloneConfig.FontSize = 16
3. 数据库连接池
// PHP示例
$originalConnection = new DatabaseConnection("localhost", "root", "password");
$cloneConnection = $originalConnection->clone();
$cloneConnection->setDatabase("test_db");
八、与工厂模式的区别
九、总结
原型模式是高效创建对象的利器,特别适用于需要动态复制或创建成本较高的场景。无论是PHP的clone关键字还是Go的手动实现,原型模式都能显著提升代码的灵活性和性能。
License:
CC BY 4.0